
Post by TIPIAC on Jul 12, 2006 4:04:31 GMT -5
this article only tackles the logic of shimming, not a shimming instruction, for those adventurous enough to deviate from standard shimming guides and spend a few bucks if something goes wrong. Don't blame me.
SHIMS
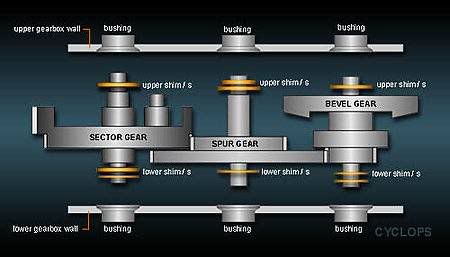
FIGURE 1.1
Purpose:To prevent gear movement along its axis. Why prevent it? Gaps between gears are important to prevent contact between gear faces and the gearbox inner walls. Shims are used to provide these gaps. What is a correct gap? There are no specific rule as to how large any gap should be. However, understanding how the gears work relative to each other and in relation to other parts of the mechbox will give you an idea.
Bevel gear - It is driven by the pinion gear on the motor. The anti-reverse latch (reverse stop latch) prevents the bevel gear from rotating in the opposite direction.
Spur gear - Driven by the bevel gear, it translates movement to the sector gear.
Sector gear - Driven by the spur gear. It compresses the spring and drives the piston back and forth. It also pulls the tappet back to chamber a round. A semi-auto latch limits the rotation of the sector gear to one cycle only.
Bushing / Bearing - Gear axles should rotate freely in the bushing. These bushings sometimes wear out easily due to improper shimming or when it is not seated properly on the gearbox. If you intend to use old bushings on the same gearbox, you should take the time to carefully inspect the bushings for the following:
1. Make sure that the hole (inner diameter) is still round. The hole become deformed as the gear axles sometimes eat up the metal due to improper shimming. One way to check is to put the bushing through a gear axle and try moving it sideways. If it moves, then its time to replace the bushings.
2. Make sure that the outer diameter of the bushing is not deformed. Bushings should sit snuggly on the gearbox. To check, install the bushing onto the gearbox and try to move it sideways. If there'as any movement, change the bushing. If the bushings are new, go get a new gearbox.
3. Make sure that the bushing does not rotate on its own as intalled on the gearbox.
SPUR GEAR SHIMS
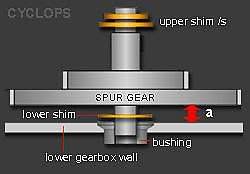
figure 1.2
lower shims: Provides a gap at point a (figure 1.2) between the spur gear face and lower gearbox wall. The thinnest (0.2mm or 0.3mm) shims are often enough. If its to clear the gbox, why not go for 0.5mm shim? The use of thinner shims allow you more flexibility in shimming other gears.
upper shim/s: To prevent movement of spur gear along its axis. Install a 0.3mm shim, close the gbox and screw it tight (1 or 2 screws will do). Poke the gear to check of it rotates freely. If it doesn't, reduce shims. If it does, try pushing the gears along the axles from both sides of the gbox. If it moves, add shim/s. Your goal is to have the spur gear rotate freely but not move sideways along the axis.
SECTOR GEAR SHIMS
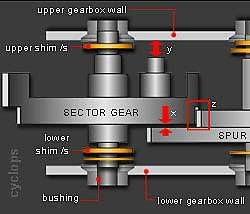
figure 1.3
lower shims: provides a gap at point x (figure 1.3) between the spur gear face and sector gear. A +0.2mm difference bewtween lower spur shim is often enough. So if lower spur is shimmed by 0.2mm, the lower sector shim can be 0.4mm. However, standard shim guides recommend that 0.4mm difference should be used. Don't ask me why. DO NOT OVERSHIM. Overshimming this part will cause a lot of problems like:
1. The upper gear face may be forced upwards to come in contact with the gearbox at point y (figure 1.3).
2. The gear may push the tappet towrds the gearbox close enough to break it.
3. Overshimming reduces teet mesh contact. Point z (fig. 1.3).
upper shims: Prevents movement of sector gear along its axis. With the spur gear shimmed and installed, install the sector gear and follow the same procedure as with spur gear to check for any unwanted movement..
Refer to manufacturer's manual for recommended shimming thicknesses.
BEVEL GEAR SHIMS
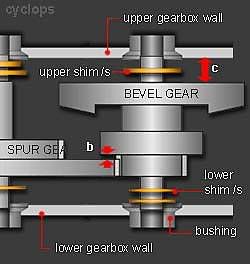
figure 1.4
lower shims: Provides a gap at point b (fig. 1.4) between spur gear and bevel gear. Do not use Systema 0.3mm shims, or any shim whose diameter exceeds that of the gear; it may come into contact with the spur gear.
upper shims: prevents movement of the bevel gear along its axis and to clear the gearboz wall at point c (fig. 1.4). Adjust shim thickness and test accordingly.
****************
So you wonder why your friend has a quiet gun when you both have the same setup. Perhaps because he took some time to shim his gearbox properly. Good shimming results in less gearbox noise.
And by the way, do not reuse shims. They tend to warp due to pressure.
You can check out this site for shimming procedures:
www.geocities.com/wajoegween/aegshim.htm
SHIMS
FIGURE 1.1
Purpose:To prevent gear movement along its axis. Why prevent it? Gaps between gears are important to prevent contact between gear faces and the gearbox inner walls. Shims are used to provide these gaps. What is a correct gap? There are no specific rule as to how large any gap should be. However, understanding how the gears work relative to each other and in relation to other parts of the mechbox will give you an idea.
Bevel gear - It is driven by the pinion gear on the motor. The anti-reverse latch (reverse stop latch) prevents the bevel gear from rotating in the opposite direction.
Spur gear - Driven by the bevel gear, it translates movement to the sector gear.
Sector gear - Driven by the spur gear. It compresses the spring and drives the piston back and forth. It also pulls the tappet back to chamber a round. A semi-auto latch limits the rotation of the sector gear to one cycle only.
Bushing / Bearing - Gear axles should rotate freely in the bushing. These bushings sometimes wear out easily due to improper shimming or when it is not seated properly on the gearbox. If you intend to use old bushings on the same gearbox, you should take the time to carefully inspect the bushings for the following:
1. Make sure that the hole (inner diameter) is still round. The hole become deformed as the gear axles sometimes eat up the metal due to improper shimming. One way to check is to put the bushing through a gear axle and try moving it sideways. If it moves, then its time to replace the bushings.
2. Make sure that the outer diameter of the bushing is not deformed. Bushings should sit snuggly on the gearbox. To check, install the bushing onto the gearbox and try to move it sideways. If there'as any movement, change the bushing. If the bushings are new, go get a new gearbox.
3. Make sure that the bushing does not rotate on its own as intalled on the gearbox.
SPUR GEAR SHIMS
figure 1.2
lower shims: Provides a gap at point a (figure 1.2) between the spur gear face and lower gearbox wall. The thinnest (0.2mm or 0.3mm) shims are often enough. If its to clear the gbox, why not go for 0.5mm shim? The use of thinner shims allow you more flexibility in shimming other gears.
upper shim/s: To prevent movement of spur gear along its axis. Install a 0.3mm shim, close the gbox and screw it tight (1 or 2 screws will do). Poke the gear to check of it rotates freely. If it doesn't, reduce shims. If it does, try pushing the gears along the axles from both sides of the gbox. If it moves, add shim/s. Your goal is to have the spur gear rotate freely but not move sideways along the axis.
SECTOR GEAR SHIMS
figure 1.3
lower shims: provides a gap at point x (figure 1.3) between the spur gear face and sector gear. A +0.2mm difference bewtween lower spur shim is often enough. So if lower spur is shimmed by 0.2mm, the lower sector shim can be 0.4mm. However, standard shim guides recommend that 0.4mm difference should be used. Don't ask me why. DO NOT OVERSHIM. Overshimming this part will cause a lot of problems like:
1. The upper gear face may be forced upwards to come in contact with the gearbox at point y (figure 1.3).
2. The gear may push the tappet towrds the gearbox close enough to break it.
3. Overshimming reduces teet mesh contact. Point z (fig. 1.3).
upper shims: Prevents movement of sector gear along its axis. With the spur gear shimmed and installed, install the sector gear and follow the same procedure as with spur gear to check for any unwanted movement..
Refer to manufacturer's manual for recommended shimming thicknesses.
BEVEL GEAR SHIMS
figure 1.4
lower shims: Provides a gap at point b (fig. 1.4) between spur gear and bevel gear. Do not use Systema 0.3mm shims, or any shim whose diameter exceeds that of the gear; it may come into contact with the spur gear.
upper shims: prevents movement of the bevel gear along its axis and to clear the gearboz wall at point c (fig. 1.4). Adjust shim thickness and test accordingly.
****************
So you wonder why your friend has a quiet gun when you both have the same setup. Perhaps because he took some time to shim his gearbox properly. Good shimming results in less gearbox noise.
And by the way, do not reuse shims. They tend to warp due to pressure.
You can check out this site for shimming procedures:
www.geocities.com/wajoegween/aegshim.htm